Tuesday 30 September 2014

DIY original pretty ring

Posted by Kate DIY at 23:38 0 comments
DIY Knot Ring
You will need: 
wider thread of 
superglue 
circle with ring 
scissors 

Procedure: 
We'll take a thread make it a knot. Then double ...... and further nodules. Now the remaining thread of cutoff and stick adhesive to the ring with the ring. Done!

DIY fox slippers

Posted by Kate DIY at 23:26 0 comments
DIY fox slippers, embroidered fox slippers, fox face slippers, what i wore, @whatiwore, Jessica Quirk, DIY

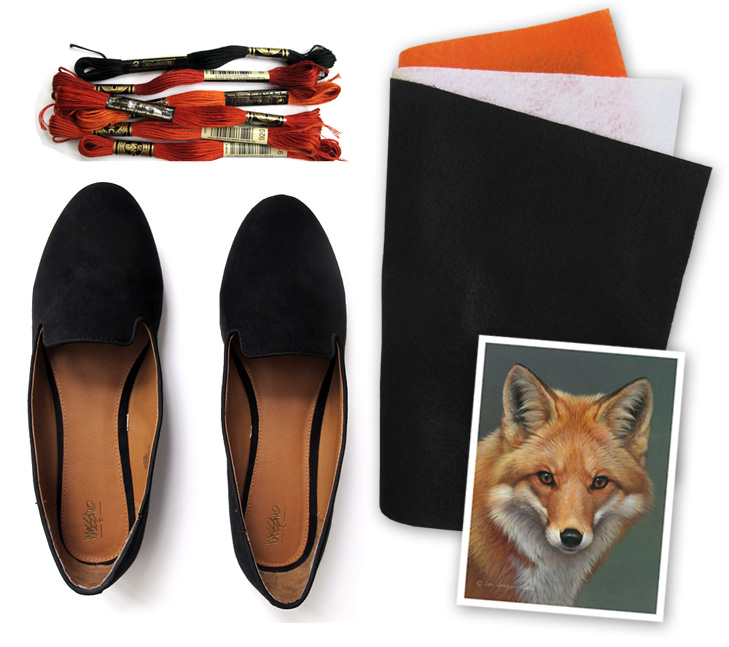
What I Wore: Embroidered slippers have been a big trend for fall, but they seem to be SO expensive. So I made my own and you can too! I took my favorite critter (FOXES!) and embroidered them onto an inexpensive pair of slippers. Best of all, my mom and sis were in town and we all sat around the dining room table working on our respective crafts. Full DIY after the jump!
Supplies:
Slippers (mine are Merona from Target for $20)
Black, White and Orange Felt
Black, White and at least 3 shades of Orange Floss
Scissors
Needle
Hot Glue Gun

DIY fox slippers, embroidered fox slippers, fox face slippers, what i wore, @whatiwore, Jessica Quirk, DIY

DIY fox slippers, embroidered fox slippers, fox face slippers, what i wore, @whatiwore, Jessica Quirk, DIY

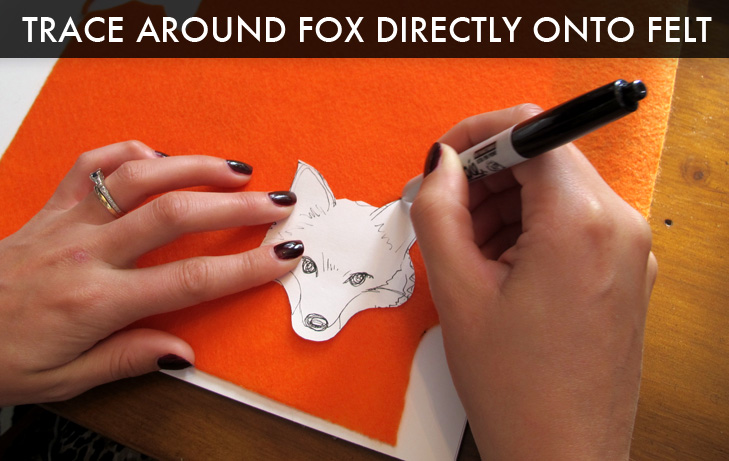
First you'll want to find an image of the fox (or other critter) you'd like to sew. I used the fox pictured above and made ​​this pattern. I then trace it directly onto the felt, but flipped it over (to hide pen marks) when I started Embroidering.

DIY fox slippers, embroidered fox slippers, fox face slippers, what i wore, @whatiwore, Jessica Quirk, DIY

Here's a breakdown of the colors and features of the embroidery (it's also worth noting That these stitches only use half of the 6 threads That make up the floss):
1 Cut white felt as a guideline for your chin embroidery. This also let me space my stitches white fur and a little more than if I did not have the guideline.
Using 2 long stitches, chin cover and add a few hairs near ears.
3 Draw on eyes and nose, using your pattern as a guide. With black embroidery floss.
4 Using your lightest orange, embroidery around border of face using long, fur-like stitches.
5 With the darkest orange, embroider around eyes (smaller stitches) and inside ears (larger stitches)
6 Add definition to the snout with a medium orange. I also added long stitches above the eyes with this color.

DIY fox slippers, embroidered fox slippers, fox face slippers, what i wore, @whatiwore, Jessica Quirk, DIY

Now that you're embroidery is complete, you can cut out your fox face with a 1.4 "to 8.1" border. BE CAREFUL! You can always trim it up, but you can not add back!

DIY fox slippers, embroidered fox slippers, fox face slippers, what i wore, @whatiwore, Jessica Quirk, DIY


Finally, apply your patches to your fox slippers. I'm usually hell bent on sewing everything, I started to whip stitching the foxes onto my shoes, but could not quite get the leverage to sew it all the way on, I continued with the whip stitch around the entire face, but used hot glue (very sparingly) to affix the remainder.
And there you have it! Will you make your own ?!

DIY fox slippers, embroidered fox slippers, fox face slippers, what i wore, @whatiwore, Jessica Quirk, DIY

Back to school week

Posted by Kate DIY at 10:42 0 comments
School started a long time ago but I decided to do a thematic week back to school which starts today and ends next Wednesday. Every day we will show you a guide on school and here is the first:


Washi Tape Pencil Notebook Tutorial


DIY Love Necklace

Posted by Kate DIY at 06:31 0 comments

as lodged with .......... ........

Posted by Kate DIY at 05:21 0 comments
1 how to fold a shirt dress


2 how to fold a shirt skirt


Cover for mobile phone

Posted by Kate DIY at 05:12 0 comments
Hello :)
So maybe not just me, but some of you have a problem with that on your cell phone you can get some nice packaging or maybe not one that can completely imagine. I have therefore thought that if I buy a newer, I'll get him a one two, but the mistake :) Then I saw in a magazine super this idea, so I told him that I will spread further :))


The first thing you'll need is a transparent cover for your cell phone, a nice image that you can either print or cut out from a magazine, pencil, scissors and hole punches :)


The first picture you cut to the dimensions of your package
cut out a second
3rd you try, whether sitting, when a large piece cut off when it is small .... it is quite a problem: D
A fourth is now time to cut the hole for the camera and flash, you can use manicure scissors, but I used .....
Punches 5th ..... :)
6th Once you have done no image, put it in a container with a cell phone and TRADATE: D

I get them done more, even though some of them have already finished works pretty: D What do you like most? :))


Flower headband

Posted by Kate DIY at 04:45 0 comments
V pondelok som sem nič nepridala tak to idem nahradiť.
Návodom na čelenku:


Sunday 28 September 2014

DIY glitter shoes

Posted by Kate DIY at 03:10 0 comments
Do you have old shoes and would like to get them improve? So this guide is for you only need glue and glitter shoes.

DIY Disco Ball

Posted by Kate DIY at 01:40 0 comments
The instructions I found it about four years ago when I was doing a party for the whole class and it was a guide to the disco ball in my opinion, it's pretty simple and functional so try :) :)


and my disco ball (long endured):

Saturday 27 September 2014

DIY easy but nice earrings

Posted by Kate DIY at 09:54 0 comments
I have little earrings so I decided to find some good tutorial for earrings and I found this:
It's amazing the old pompons beautiful earrings :)


DIY Leopard short

Posted by Kate DIY at 09:42 0 comments
Pretty!

DIY diary

Posted by Kate DIY at 08:30 0 comments
need: 
- Cartons (eg. From cereals), 
- Scissors, 
- Clean papers (you want to have a clipboard), 
- Needle, 
- Thread 
- Glue, 
- Button. 

procedure: 
From cardboard boxes to cut the desired shape and size notepad. Cutouts translate in half. On the one hand sewn needle and thread button. Then insert the papers that you have zípisníku. Needle and thread them in the middle of the workbook. To end notebook from external parties decorate and attach a thread, which will close the notebook.


DIY moustache necklace

Posted by Kate DIY at 07:57 0 comments
Moustache pattern is quite popular and here is why I decided to give guidance on the mustache necklace:

First, to trace the hard paper and cut out this template:

mustache template for leather mustache necklace tutorial

And just follow the instructions

DIY - Leather mustache necklace tutorial

How it looks to me:


DIY Skull Shirt

Posted by Kate DIY at 06:48 0 comments
Here is one pretty good, and a nice user-shirt I think that the description is not necessary but it for sure:

Draw on a t-shirt from the back and cut out the desired pattern :) :) :) I do not know about you but I'm going to try immediately.


Hello!

Posted by Kate DIY at 05:54 0 comments
Welcome to my blog focused mainly on DIY I hope that you'll enjoy my blog and you will be here to attend the rubric: 
DIY fashion 
DIY Jewelry and Accessories 
DIY other stuff 


and it will probably be quite rubrics DIY ..... maybe add some time and finally my signature:

BY KATE


DIY tutorials by Kate Template by Ipietoon Blogger Template | Gadget Review