 One user did not like my shirt but never mind. Otherwise I will start from today in the box DIY Fashion also give my own posts :) :) I hope you like it
About Me

- Kate DIY
- I'm a girl and my name is Kate. I love DIY tutorials and so I have decided to create a blog. Regarding my hair style emo I'm no fan of the hair but I liked it so I did. Council listen to music mainly from Avril Lavigne and Cher Llyod.TIež I love fashion loves to shop and then into clothing and accessories dressing. And to include the wearing of makeup is the kitten often crazy (yesterday I drew a face on the Eiffel Tower) and speaking of the Eiffel Tower I love Paris and France (although I was there) and that's about all the essentials.
Thursday 2 October 2014
DIY t-shirt
One user did not like my shirt but never mind. Otherwise I will start from today in the box DIY Fashion also give my own posts :) :) I hope you like it
Back to school week: ruler(from my workshop)

scissors
adhesive
transparent ruler
magazine clippings


Now I turn my ruler so that the number was contrary magazine pieces and begin to stick to it !! Attention should not apply to the number of magazine pieces !!

When we have pruned glued pieces that stand out

Done!
Earrings made of plastic eggs (from my workshop)

Welcome to my tutorials next time we will produce earrings &
we need
2 plastic egg on a string
2 hooks
normal fix
permanent fix


On the one egg before we draw a normal marker pattern or face permanent and then overlaid with a marker.

Inspiration

The same with the second egg
Now we capture a thread on the hook and you're done

DIY ombre shirt
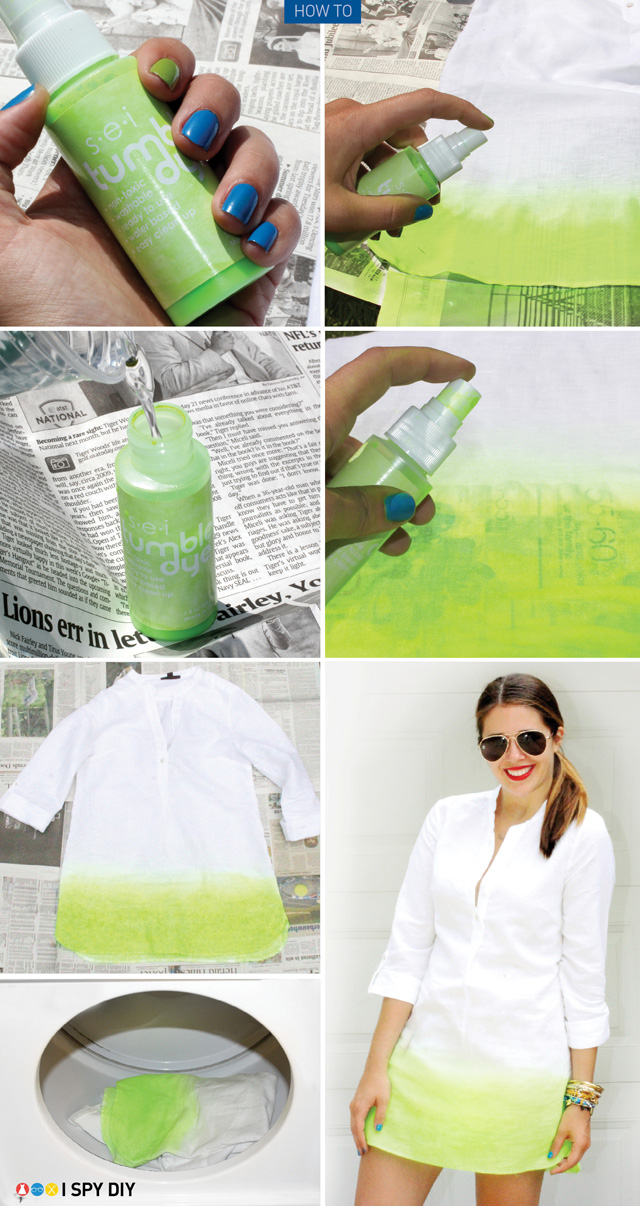 ombre Although no longer the biggest hit but it still looks like a nice and here's the shirt ombre think that the process is clear:
Wednesday 1 October 2014
DIY bookmark(from my workshop)
And again my guide I do not know you but I am enjoying it .... the whole shoot to prepare :) :) And here's the guide:

You will need:
adhesive
scissors
pen
paper
fix
procedure:
Paper a little fire in the corner and it cut out the scissors. On another piece of paper, a pen, draw the outline of some simple shape to color it with a marker. Now we just stick it on our tab and put it in a book or workbook.
as I liked to go with originality: D: D?
DIY bracelet twine (from my workshop)
This time I did own instructions ... the bracelet .It my first so I hope not sink criticism .A here we go:

You will need:
scissors
twine
procedure:
Twine around the cutoff as well three long strips that knot at the end. Now we start with the bonding process: the left through the median .... right through to middle to classic entanglement cope. When the bracelet so long that it can put on your hand and give us knot bracelet which still entangled together and you're done!
DIY moustache t-shirt

Here is a new DIY!! I was cleaning out my closet and found this old white shirt and thought, I can use this. Everywhere you look at fashion sites and clothingsites you find moustache shirt. But why would you pay for it if you can make it yourself? So let's start :)
What do you need:
- Moustache pattern
- pencil
- Black clothing paint (or like me acryl paint)
- old shirt
- sciccor
- brushes
- A hard surface which you can put under your shirt
- clothes pegs
How?
1. Search for a moustache pattern that you like, print the pattern and cut it out.

2. Place the hard surface ( I used cardboard) and put it in your shirt so you won't paint the back of the shirt too ;)
3. Make sure your shirt is thight, you can do this with clothes pegs.

4. trace the pattern on your shirt, where you want it.
5. paint the pattern, I did first the outlines with a small brush and then I painted the whole pattern with a bigger brush.
6. I waited till the first layer was dry and then I made more layers so you don't have white spots.
7. Let it dry and you're done :)

Subscribe to:
Posts (Atom)