 One user did not like my shirt but never mind. Otherwise I will start from today in the box DIY Fashion also give my own posts :) :) I hope you like it
About Me

- Kate DIY
- I'm a girl and my name is Kate. I love DIY tutorials and so I have decided to create a blog. Regarding my hair style emo I'm no fan of the hair but I liked it so I did. Council listen to music mainly from Avril Lavigne and Cher Llyod.TIež I love fashion loves to shop and then into clothing and accessories dressing. And to include the wearing of makeup is the kitten often crazy (yesterday I drew a face on the Eiffel Tower) and speaking of the Eiffel Tower I love Paris and France (although I was there) and that's about all the essentials.
Thursday 2 October 2014
DIY t-shirt
One user did not like my shirt but never mind. Otherwise I will start from today in the box DIY Fashion also give my own posts :) :) I hope you like it
Back to school week: ruler(from my workshop)

scissors
adhesive
transparent ruler
magazine clippings


Now I turn my ruler so that the number was contrary magazine pieces and begin to stick to it !! Attention should not apply to the number of magazine pieces !!

When we have pruned glued pieces that stand out

Done!
Earrings made of plastic eggs (from my workshop)

Welcome to my tutorials next time we will produce earrings &
we need
2 plastic egg on a string
2 hooks
normal fix
permanent fix


On the one egg before we draw a normal marker pattern or face permanent and then overlaid with a marker.

Inspiration

The same with the second egg
Now we capture a thread on the hook and you're done

DIY ombre shirt
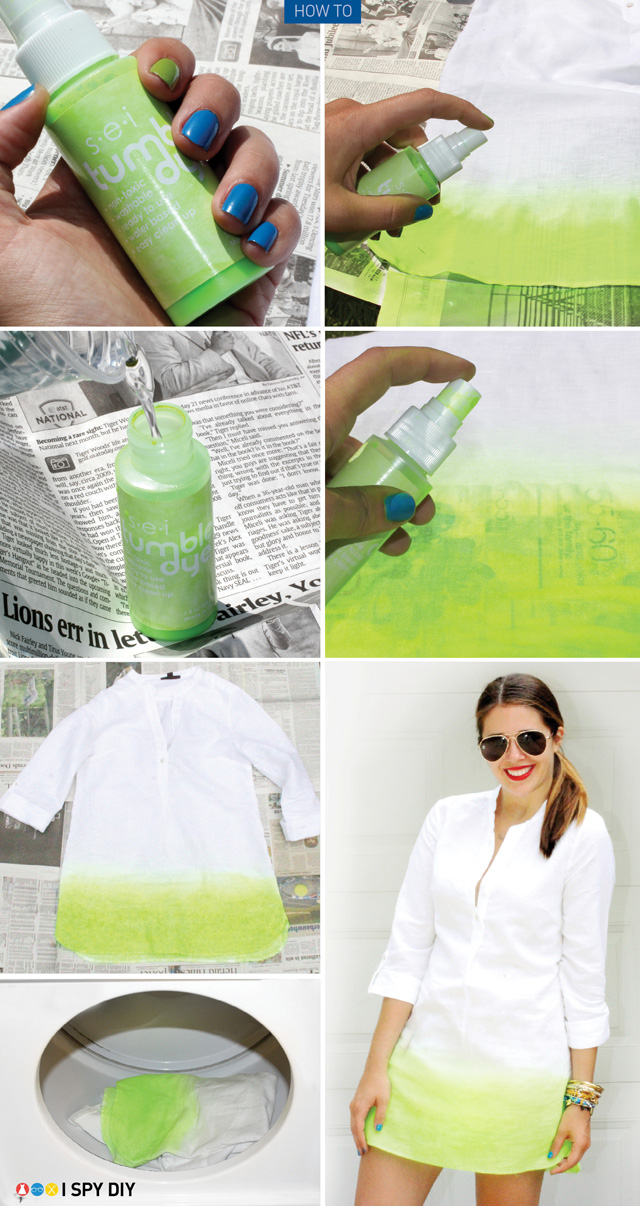 ombre Although no longer the biggest hit but it still looks like a nice and here's the shirt ombre think that the process is clear:
Wednesday 1 October 2014
DIY bookmark(from my workshop)
And again my guide I do not know you but I am enjoying it .... the whole shoot to prepare :) :) And here's the guide:

You will need:
adhesive
scissors
pen
paper
fix
procedure:
Paper a little fire in the corner and it cut out the scissors. On another piece of paper, a pen, draw the outline of some simple shape to color it with a marker. Now we just stick it on our tab and put it in a book or workbook.
as I liked to go with originality: D: D?
DIY bracelet twine (from my workshop)
This time I did own instructions ... the bracelet .It my first so I hope not sink criticism .A here we go:

You will need:
scissors
twine
procedure:
Twine around the cutoff as well three long strips that knot at the end. Now we start with the bonding process: the left through the median .... right through to middle to classic entanglement cope. When the bracelet so long that it can put on your hand and give us knot bracelet which still entangled together and you're done!
DIY moustache t-shirt

Here is a new DIY!! I was cleaning out my closet and found this old white shirt and thought, I can use this. Everywhere you look at fashion sites and clothingsites you find moustache shirt. But why would you pay for it if you can make it yourself? So let's start :)
What do you need:
- Moustache pattern
- pencil
- Black clothing paint (or like me acryl paint)
- old shirt
- sciccor
- brushes
- A hard surface which you can put under your shirt
- clothes pegs
How?
1. Search for a moustache pattern that you like, print the pattern and cut it out.

2. Place the hard surface ( I used cardboard) and put it in your shirt so you won't paint the back of the shirt too ;)
3. Make sure your shirt is thight, you can do this with clothes pegs.

4. trace the pattern on your shirt, where you want it.
5. paint the pattern, I did first the outlines with a small brush and then I painted the whole pattern with a bigger brush.
6. I waited till the first layer was dry and then I made more layers so you don't have white spots.
7. Let it dry and you're done :)

DIY pretty rug
.jpg)
To inaugurate my paint sprayer, I decided to paint a rug. Yup a rug! After doing some research, I decided to smash Addicted 2 Decorating and Almost 40 Year Old Intern tutorials into my own. Here’s how it went down.
The Supplies:
- Rug from Home Depot
- Finish Max Paint Sprayer
- Base color paint (I used Olympic White in Exterior) – You don’t need this if you like the base color of the rug
- Accent color paint (I used Valspar Duramax color matched with Pantone’s Sangria)
- Tape (the cheap duct tape)
- Drop cloth
- Exacto Knife
- Measuring Tape/Yard Stick
- Calculator/Simple Math Skills
The Process
.jpg)
First you need to get your rug the base color you would like. If you like brown (or your rug’s color) skip this step. Brown wasn’t in my color scheme so I opted to paint my rug a nice bright white.
.jpg)
.jpg)
However, it does take time to get a brown rug white. Thank goodness for the paint sprayer! I sprayed the rug 4-5 times (sort of slow to get maximum coverage but quick enough not to get splotches). I found that using the cone sprayer option got me the best coverage. I just started on one end and worked my way down. Then I would wait long enough for it to dry so I could walk on it again and spray another coat.
.jpg)
Originally I thought I was going to have to elevate the rug clothesline style to be able to spray paint it. I had this whole elaborate scheme worked up (including buying rope and copious amounts of clothes pins) of stringing the rug up with drop clothes plastered everywhere around it. However, time and hassle was saved when I realized I could hold the sprayer at a 45 degree angle and still get a great stream of paint. Phew, cause that was just going to be crazy.
After the base coat dries (I recommend at least over night) it’s time to pick a pattern and get taping. Here is where you need to learn from me. Save some money and time by buying the cheap duct tape. Nope, don’t even buy the brand name stuff and for heaven’s sake don’t buy the $10 really nice painters tape. Want to know why? Because I did. I spent $10 and 3-4 hours taping down a pattern that didn’t stick. Temper tantrums might have been thrown. But after a staring contest in the tape aisle for about 15 minutes, I came home with the winner – cheap duct tape. So start with that – please!
.jpg)
You want to pick a pattern that you can tape out. Whether it’s stripes or something more elaborate, it’s best done with tape. I decided to go in between stripes and elaborate, using Almost 40 Year Old Intern’s pattern as my guide.
Now you have to break out the calculator and grease your math skills. It’s time to measure that rug and decide your pattern widths. First, decide how far in you want your pattern to start (aka how big a border you want). Then, use that width and length to make your calculations. First I made vertical stripes, measuring one larger stripe and then one smaller stripe.
.jpg)
Then, I made horizontal stripes, once again having one larger and one smaller.
.jpg)
Once you have all your stripes taped down, then take an exacto knife and start cutting out your pattern. You can see I cut out the stripes so I just have a lot of boxes. Once the boxes were cut off I used smaller pieces of tape to connect them. Bad Megan, but I just eyeballed the middle to connect them. It seemed to work out fine. Be warned on this step though cause it takes a lot of time. Like two movies or four 45 minute TV shows worth of time. That really helps make this tedious task better.
.jpg)
As a final effort to keep that tape down I used my dough roller to roll over the tape one last time to really help it stick.
.jpg)
Next, I did a white coat over the tape as extra insurance of getting clean lines. You have to get your hands dirty a little bit on the first coat since the sprayer’s power sometimes lifted the tape a little bit, but once that coat dries it all sticks pretty well. You also learn the “sweet spray spot” where you get good coverage but the force behind the sprayer isn’t lifting up the tape.
.jpg)
Finally, after the last white coat had dried, I was able to put on my pop of color – Sangria by Pantone (color matched in Valspar’s Duramax)! This is really when the happy dances started to happen (since this project had been going on for hours upon hours upon days). The color was gorgeous and it was going on perfectly. I ended up doing three coats of this for truly saturated color.
.jpg)
After the last coat dried, it was do or die have another tantrum time. Up came the tape…and out came a perfectly perfect, beautiful patterned rug!
.jpg)
Run a victory dance around your house and then fall to the ground in exhaustion cause this took some time. But man was it worth it.
As extra security I used Valspar’s clear gloss protective spray over the rug.
.jpg)
I am SO THRILLED with the results I want to make up a song about it and then film a music video of me dancing on the rug. Instead I will just pet the rug, gaze at the rug, lie on the rug, and hug the rug. I think all the time (and a few tears and a $10 roll of waste tape later) that I put into this rug makes me love it even more. It’s something I completely transformed from an average brown rug to a beautiful, geometric beauty!
Now here it is in its permanent home in the sun room. It really adds the crowning glory to the room!
.jpg)
.jpg)
.jpg)
.jpg)
.jpg)
DIY Galaxy Shorts

It’s no secret that the galaxy print is all the rage right now, whether you’re surfing through Pinterest or shopping at the mall. We got sucked into the trend and just had to get me some galaxy shorts! There are tons and tons of tutorials online to make your own galaxy print but we couldn’t seem to find one we truly liked. So that is why we decided to experiment one day and we were more than happy with the result and we hope you are too!
 Supplies:
- Black shorts (try checking Goodwill!)
- Sponge(s)
- Fabric paint (white, pink, blue, purple, green, and black)
- Bleach
- Spray bottle
- Bottle nose
- Old towels or newspaper
- Plastic bags
- Paper plate (not shown)

Step 1: Lay out your shorts on a flat surface with newspaper or old towels underneath. Stick some plastic bags inside your shorts to prevent any bleach from bleeding through to the other side.

Step 2: Fill your spray bottle with some bleach. You don’t have to go out and buy one. We used an old spray bottle we found in my house. When applying the bleach you want to be very careful not to over do it. Spray a little and wait for the fabric to change color before you apply more. To make the galaxy print, target a few sections that will eventually be the “nebula” as you can see below.


Step 3: Apply bleach on the backside. Let the shorts dry a little bit before applying paint.

Step 4: Time to prime! Take some white fabric paint and apply it to the “nebula” areas with a sponge. This part can be slightly difficult because blending paint into fabric takes some elbow grease. The purpose of adding white paint is so that when you add color, the color stands out vibrantly. Basically, wherever you want color to be, put on some white first. Below is how it should like when you are done priming. Repeat this step onto the back.


Step 5: Yay! It’s time for color. Take your desired color and put it on the sponge. Like how you applied the white, blend the color into the “nebula” areas. I like to have two colors blend into each other in the “nebula” areas like shown in the picture below, on the right thigh “nebula” I mixed blue and green.


Step 6: Take the bottle nose and dip it into some white paint. Apply small dots randomly around the the shorts to create stars. Be sure to add a lot more stars into the “nebula” areas and vary the size a little.

Step 7: Add color and stars to the back of your shorts. The only thing you have to do differently is blend the front into the back on the side of the shorts so that the galaxy print smoothly transitions.

And voila! Beautiful galaxy shorts that your friends will soon be trying to steal from your closet! This galaxy print tutorial was originally posted onto the blog, Colleeflower. Check it out!


Week Back to School: School playground
 I’ve been saving some cereal boxes and toilet paper/paper towel rolls for awhile. I’m not just some weird hoarder – I had a purpose. My goal was to recycle these items in a Mod Podge project. I thought, if everyone else can use these items for crafts, I can too. So I challenged myself! It’s kind of fun to do that sometimes to see what you come up with.
Based on what I had in my stash, I created this DIY desk organizer, aka the perfect recycled craft. I just used what was on hand so I didn’t even spend one dollar for this. I won’t say it’s totally free because you might have to buy some supplies . . . but you should challenge yourself to see how cheaply you can make it! Here’s how I made mine using decoupage.
Gather These Supplies
- Cereal boxes and toilet paper rolls
- Wood plaques
- Mod Podge Satin– if children do this project, use Mod Podge Kids Washout
- Acrylic paint in the colors of your choice
- Scrapbook paper to cover your boxes and rolls
- Ribbon in coordinating colors
- Scissors
- Craft knife
- Craft Glue
- Paintbrush
- Pen or pencil
- Ruler
- Tape
 Here are my supplies. I wasn’t quite sure how I was going to turn this pile o’ stuff into a desk organizer, but hey, it was a challenge. Right?
 I had no idea how to measure the cereal box for my bins, I’m going to be honest with you. So I just cut 1/4th of the box off of the bottom and then proceeded to cut the rest of the box in that same manner. I knew I would have a front row and a back row, so I made the “back row” of boxes taller than the front row.
 So here is a finished bin. I also made two smaller compartments by cutting the larger compartments down and taping them. Don’t worry – you’ll cover over that tape with Mod Podge and paper.
 I’m completely exhausted at this point. But I have a structure for my desk organizer! If you like, trim the TP/paper towel tubes to different heights to add interest.
 I needed to take a break from cutting cereal boxes, so I painted my plaque. Choose colors that coordinate with your paper, paint the whole plaque and then let dry.
 Now this is an optional step . . . but I used some white paint on the edges of my cereal boxes and tubes. Sometimes my paper doesn’t match EXACTLY and I didn’t want the brown of the tubes or the colors of the box to show (since they didn’t match). If you are particular, you might want to do this. If not, don’t worry about it.
 Now that everything is painted and ready, time to trace. Take a pencil or pen and trace each compartment on your scrapbook paper.
 Cut everything out.
 Add Mod Podge to the backs of all of the papers . . .
 And then proceed to decoupage your compartments with paper and Mod Podge. Hold everything down, smooth and let dry 15 – 20 minutes. Then give it a top coat.
 Don’t forget to Mod Podge your plaque as well, just to seal.
 Add ribbon to the top edge of each compartment with the craft glue. I did it on the rolls as well.
 Glue each compartment down to the plaque using craft glue. You’ll see white around the edges, but it will dry clear.What do you think – are you up for making a DIY desk organizer of your own? What would you Mod Podge from cereal boxes and toilet paper rolls?
Subscribe to:
Posts (Atom)